Monday, March 31, 2014

What a Crazy 10 Days!

Hi Guys and Gals!!

By now I'm sure that you are as shocked as I am to see a new blog post. Wowzers!! Talk about life happening ... husband, teenager, mother, sister, brother-in-law, nephews, mom's dachshund, sister's chihuahua, nephew's turtle, neighbor's fish, grocery store, school, and church just about sum it up!! I think the only thing I am missing is a partridge in a pear tree stamping!!! It was seriously nuts!!


Obviously since I said that the only thing that I was missing was STAMPING, I'm sure you have already drawn the conclusion that I have nothing, nada, zip, zilch to show you today, but never fear, tomorrow is April 1st which means I can start showing you my April CCrew Design Team projects!! Yippee!!  I absolutely *LOVE* the cards and scrapbook page that I created for the month and can't wait to share them with you. Bright, cherry, and happy are probably the three words that best describe them so you will definitely want to stop by tomorrow!!

Exciting News + Design Team + Announcement = I have been asked to return to the Stampin' Up! Creative Crew Design Team for the CCrew DT Mega Round!!! So what does that mean? Well, I'm glad you asked! I will join 23 other talented CCrew DT Alumni to bring you 4 projects each month for the next four months. That's right, a total of 96 projects to provide you inspiration from May through August!! It is an honor to have been asked to return as a designer for the mega round and I'm looking forward to our upcoming DT projects!

Speaking of announcements, I have been asked to, and will be designing for, a non-stamping related company whose versatile product(s) can be used as a means to express your personal taste and creativity using an everyday item. How's that for a cliffhanger?!? You will definitely want to check back often to see the reveal of the product and, as an added bonus, as soon as the details are finalized I will have a DISCOUNT CODE for you, as my blog readers to use!! Whoop!!!

Since I don't have anything to bedazzle creatively inspire you with, I will take a minute to remind you that TODAY! is the final day of Sale-A-Bration so make your list, check it twice, and place your order on my SU! website before this year's exclusive products are gone!! Do you want a Handmade by Hallie card?!? Of course you do, so get yours today by placing an order NOW!?!? Hustle on over to my SU! site and shop before the clock strikes midnight!


I'll see you tomorrow!!
Hugs, Smiles, and Blessings!
Hallie
"I can do all things through Christ who gives me strength." Philippians 4:13

Tuesday, March 25, 2014

Life Happens ...

John Lennon's quote pretty much sums up my last 5 days!!!


Please DO NOT give up on me, I promise to be back within the next couple of days.  We had a pretty dang big, unexpected, but great life change occur within the four walls of our home over the weekend and I'm doing my best to get back in the groove of creating and blogging ASAP!!!

In the meantime, please head over to my friend Marsha's blog and check out the ADORABLE 3x3 note card box that she made! While you do that, I am off to "do life".

Hugs, Smiles, Blessings, and Happy Stamping!!
~Hallie
"...and let us run with perseverance the race marked out for us, fixing our eyes on Jesus, the pioneer and perfecter of faith." Hebrews 12:1-2

Tuesday, March 18, 2014

Triple Time Stamping

As it turns out, I did not make it to my craft room yesterday to have something for you this morning; however, I am sneaking this post in now; in just enough time to have it count for today!! Yay!!

Thankfully my hubby is MUCH better and will be returning to work tomorrow which means I will be able to spend most of my day stamping. I am a little panicked because I currently have eight, that's right - EIGHT!, Design Team assignments that I need to do in addition to several other projects. YIKES!! The only down side to my DT work is that I can't share my projects with you until they go live; 4 on April 1st and then 4 more on May 1st (that was a hidden announcement, did you catch it?!?). What's the saying?!?  All good things come to those who wait!! It's a good thing that I'm the one creating the projects and will see the end result immediately because I'm not a patient person. Nope - Not Me!! I am all about instant gratification!!

Speaking of instant gratification, how about I show you today's project?!?  Actually, hang on just a second while I tell you that I visited my dear friend Marsha's blog, found her Triple Time Stamping (TTS) tutorial, and then stole CAS'd (that's Copy And Shared) my version of her card. If you've never made a TTS card, I highly recommend you boogie head on over to her blog and follow her instructions - they are wonderful!! You could also be so kind as to leave her a sweet comment when you are there!! Now for my card...


 (click to enlarge)

That's all for now!! I'm off to continue creating while my creative juices are flowing!!

Hugs, Smiles, Blessings, and Happy Stamping!!
~Hallie

All supplies Stampin' Up! (you can order HERE).
Stamp Set:  Flower Shop; A Dozen Thoughts

Ink: Pacific Point; Tangerine Tango; So Saffron
Cardstock:  Pacific
Point; Tangerine Tango; So Saffron; Whisper White
Accessories: Pansy Punch; White Baker's Twine; Basic Pearl; Dimensionals
Techniques:  Paper Piercing
Note: The background flowers were tapped off TWICE before stamping them onto the Whisper White cardstock.  The single popped up flower is 100% saturated Tangerine Tango ink (in other words, ink pad to paper ... no stamping off!).

Monday, March 17, 2014

From St. Patrick's to Sympathy ...

Good Morning and Happy St. Patrick's Day, Everyone!!!

I am obviously waaayyy late posting because my original plans went down the toilet (no pun intended) drain.  I have been dealing with a sick hubby (achy, fever, upset stomach, vomiting, and you can use your imagination for the rest - see no pun intended above!) for the past 36 hours so I did not make it to my craft room at all yesterday to make my final project for you today. Sorry!!! No need to fret though, I will change up the colors and show it to you at Easter!! Don't you just love how versatile stamping is?!?  I sure do!!

I shift from St. Patrick's Day to sympathy because late last week my neighbor asked me to make a sympathy card for one of our other neighbors whose father recently passed away. I used a loose interpretation of MOJO295, the Crosses of Hope stamp set, some Modern Medley DSP, Basic Black and Whisper White cardstock, and Black Grosgrain Ribbon to create this elegant beauty!!

 
(click to enlarge)

That's all for now. I am hoping to get to my craft room later today which means I should have a little something new for you tomorrow!!

HERE is this week's MOJO sketch and a link to my Facebook Page; I'd love to see what you create!

Have a blessed day!!
~Hallie

Sunday, March 16, 2014

7 Days to St. Patty's - Day #7: Petite Card Purse

Happy Sunday, Folks!!

As I promised yesterday, I am back today with the petite version of yesterday's Card Purse. After I finished making the standard size purse using the tutorial found HERE, I decided I wanted to make a smaller version. I couldn't find a tutorial so I altered the measurements in order to have a purse to hold 3x3 cards. Fortunately for me, it was fairly straight forward. Unfortunately for you, that makes this post rather boring. Since that's the extent of the excitement, I present to you my monogrammed Petite Card Purse with matching note cards and envelopes.

 (click to enlarge)

 (click to enlarge)

(click to enlarge)

That wraps up today so I'll be back tomorrow with a surprise final St. Patrick's Day project. 

Have a blessed Sunday!!
Hugs, Smiles, Blessings, & Happy Stampin'!
~Hallie
"This is the day the Lord hath made, let us rejoice and be glad in it."  Psalm 118:24

Saturday, March 15, 2014

7 Days to St. Patty's - Day #6: Card Purse

Good Morning Dear Readers!! 

I have a SUPER CUTE project to show you today. I don't know about you, but I *LOVE* all things that are "matchy, matchy", as my hubby calls it, and today's ensemble certainly fits that bill. As I was looking for seven somewhat simple, non-card, easy to duplicate projects for St. Patrick's Day, I came across a Card Purse and knew I'd found a winner!!  I got busy and in no time at all had come up with my version of the ensemble.

(click to enlarge)

 (click to enlarge) 

 (click to enlarge)

The tutorial that can be found HERE is very well written and  super easy to follow. I made a couple of minor changes to my version as I was making it.  I omitted Step 5 (I did not notch the top of my box) and I found that it made it easier to assemble the box by removing the bottom corner as indicated in the picture below.


 (click to enlarge)

That's all for me today, and although I don't have a sneak peak to post, I will tell you that I will be back tomorrow with a PETITE version of today's card purse so make sure and check back.
Have a great Saturday and I will see you back here tomorrow!!

Hugs, Smiles, Blessings, & Happy Stamping! 
~Hallie 
"Grace and peace to you from God our Father and the Lord Jesus Christ." Ephesians 1:2

Friday, March 14, 2014

7 Days to St. Patty's - Day #5: Sour Cream Container

Happy Friday Before St. Patrick's Day!!

Do you know what happens when you go to bed and realize that you haven't done your Friday blog post? That's right, you leap from your bed to your craft room in a single bound!! Okay, maybe that is a bit of an exaggeration because I am definitely not Superman, or Superwoman, nor Superanything at the moment except Supertired which means that this post is likely going to be Supershort or possibly even Supersilly because that seems to be the direction in which it is heading!! Having said that, I am going to assume that you are here for my craftiness rather than my antics ... or maybe it is my antics ... or maybe it is for both ... or quite possibly maybe for neither! Whatever the reason, I am glad you are here and I will go ahead and show you today's project before you become like Nicolas Cage and are Gone in 60 Seconds roll your eyes, shake your booty head, and move on to the next blog! Today I present to you ... a sour cream container!!!

Actually, wait just a minute! Before I go showing you my stinkin' cute container, I have to tell you that my original plan was to post a picture of an ORIGINAL sour cream container in addition to my version; however, after days hours of searching, and even calling in additional researchers, a picture of an original container is nowhere to be found!! I kid you not, and I know it's hard to believe, so go ahead and search for yourself!! As a matter of fact, I challenge you to find me a picture of an original single serving sour cream container and in return, I will post the name of the first person who finds it on my blog and make you famous let the world know that you are obviously a much better researcher than I am. I will tell you that we spent close to seven hours searching everything from sour cream, to sour cream container, to single serving sour cream container, to twisted tube, to Daisy (the company that made them), and Borden (in case it wasn't Daisy), and more. We searched every possible word / combination of words we could think of and found zip, zilch, nada, nothing!! Now that I've made a big deal about it being impossible to find a container, I'm sure one of you, my dear readers, will find one in no time at all. So when you do, please post the picture (and link to where you found it) on my Facebook Page for all to see.

And now for my super simple and absolutely adorable St. Patrick's Day Sour Cream Container ...

(click here to enlarge)

(click here to enlarge)

This container was a lot of fun and exceptionally easy to make using the directions found
HERE. If you decide to make a container of your own, please leave a link to your project in the comments section below - I'd love to stalk your creation see what you made.


Make sure and check back tomorrow! You won't want to miss this ...


That's all for me today!!
Until next time ... Happy Sour Cream Container Searching & Making!!! 


Hugs, Smiles, Blessings, and Happy Stamping!!
~Hallie

"For this very reason, make every effort to add to your faith goodness; and to goodness, knowledge; and to knowledge, self-control; and to self-control, perseverance; and to perseverance, godliness; and to godliness, mutual affection; and to mutual affection, love. For if you possess these qualities in increasing measure, they will keep you from being ineffective and unproductive in your knowledge of our Lord Jesus Christ. 2 Peter 1:5-8

Thursday, March 13, 2014

7 Days to St. Patty's - Day #4: Box in a Bag

Hello Friends, Stampers, and Readers!!

Today's fairly straightforward and boring blog post brings to you my fourth St. Patrick's Day project ... a box in a bag. Yes, I know, this is nothing new; however, it is new to me ... and I love it!! I have seen a ton of these over the years but have never taken the time to do my research to figure out how to make them. That changed this past weekend when I was determined to find seven relatively simple projects that I liked but had never made. To be honest, I was pleasantly surprised at how quick and easy it was to create; therefore, it is definitely a project that I will do again. If you'd like to make your own box in a bag, the tutorial can be found HERE ... and of course I'd love it if you bought your supplies HERE!! I don't see myself getting rich by any means; however, a few dollars here and there to help restock my supplies so I can continue to bring you crafty goodness and inspiration is very much appreciated!!!

https://blogger.googleusercontent.com/img/b/R29vZ2xl/AVvXsEhv-Gvxg2WN0TXcsRrCvM53ahqjqCmdLSV_3PfUP1MAnvEEi8wq6YvFqpGsMBiTzPp2l8D5vWLLYi76pm0gUy_iJjiKRaEHa6eigZ9-7-IhTeA2uAn6YkL_Mo6sgjqSuW1amcScedQzEdc/s1600/Box+in+a+Bag.JPG
(click here to enlarge)

Are you ready for tomorrow's sneak peek?!?!  Since I aim to please, here ya go ...

https://blogger.googleusercontent.com/img/b/R29vZ2xl/AVvXsEj8RnPFtK6_Ftq2YH9HIo5qdnq-RJKJFH2_gF7_Ufq-XEO26R418sUlKaQ-M_wyEMv-eivZt30OjEP3I6URDmVjWlL-S19vWyBNOX6X1j0y6IEEYVmg871C2dudbhK45j6ugzJZWL-xtno/s1600/Sour+Cream+Container.JPG
(click to enlarge)

That's all for now, see you back here tomorrow!!

Hugs, Smiles, & Blessings,
~Hallie
 
"And we know that in all things God works for the good of those who love him, who have been called according to his purpose." Romans 8:28

Wednesday, March 12, 2014

7 Days to St. Patty's - Day #3: Fry Box

Welcome, Wednesday Readers!!

We are now T-6 days away from St. Patrick's Day which means that it is time for me to share my third project with you ... a Petite Fry Box!! You probably recall that the first fry box I made was for one of my March SU! CreativeCrew Design Team projects; however, this one is much smaller so it takes a lot less candy to fill it. That means I get to eat more and share less it is much more economical to give as a gift or party favor.

Rather than continuing to bore you with my babbling, I present to you, ladies and gentlemen, my Irish themed Petite Fry Box!!

(click to enlarge)

Quick, cute, and perfect for giving to your child's teacher and/or classmates, a co-worker, or a friend to enjoy!!

That's all for today so I will leave you with tomorrow's sneak peek:

(click to enlarge)

Hallie's Helpful Hints:
 
It was brought to my attention by one of my Canadian readers, have I mentioned that I LOVE hearing from y'all?!?, that she could not leave comments on my blog when using her iPhone; however, she could comment when using her computer.  After doing a bit of research, I found this article, which I believe is the solution for all of you iPhone, iPad, iWhatever users. It worked for her so I am hopeful that it will work for you as well.

Hugs, Blessings, and Happy Stampin'!!
~Hallie

Tuesday, March 11, 2014

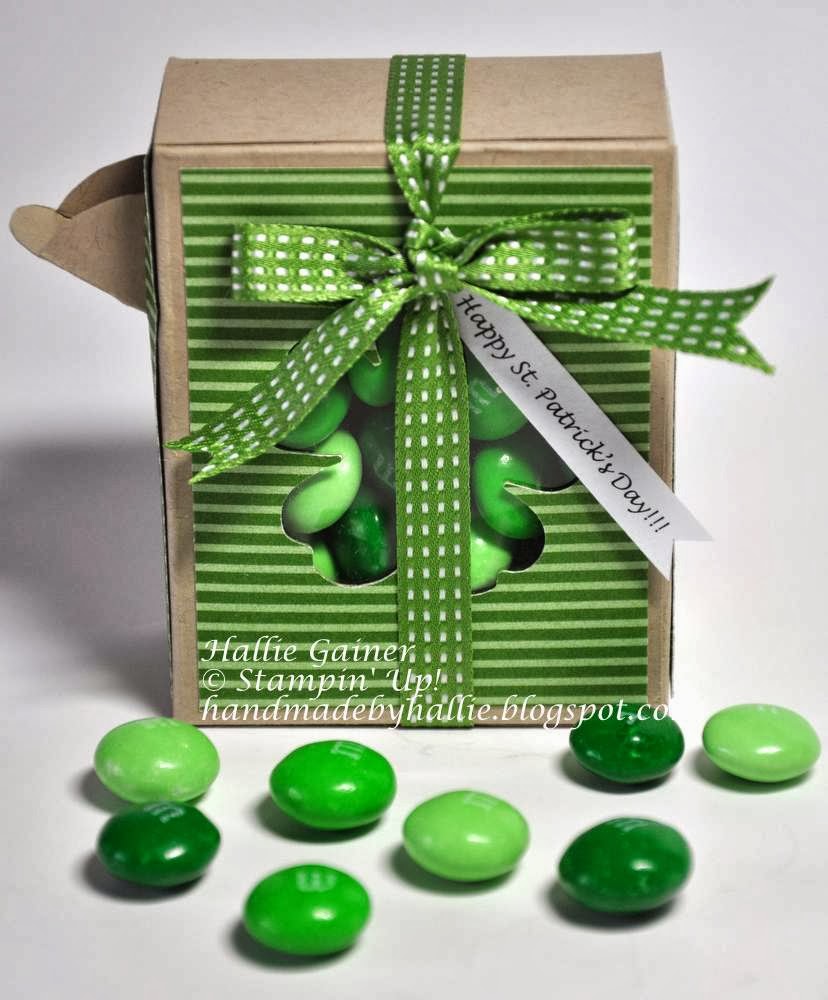
7 Days to St. Patty's - Day #2: Pour Box

Hello Readers!

On the 6th day before St. Patrick's Day the Handmade by Hallie blog gave to you ... oh nevermind!!! 

Let's be honest, you can only greet your readers day after day in so many clever ways and since this is my 18th blog post, I'm quickly running out of greetings. I suppose I could make a game of it and start translating how I greet you into various languages and then you could guess the language and then translate it back to English; however, I'm sure you'd prefer I just greet you with a boring greeting instead. If for some crazy reason you like the first idea, leave me a comment and I will aim to please. In the meantime, I will move forward and share with you today's St. Patty's Day item. A Pour Box ... with a spout ... and M&M's. 

This is actually the second pour box that I've made. I made the first one a couple of Decembers ago and filled it with Magic Reindeer Food in order to attract some venison for our freezer as a treat for Santa's reindeer.  You can see that version here. No need to fret, no reindeer were harmed that Christmas Eve, or any other Christmas Eve for that matter, because I do not like venison. But I digress .... 

Pour Box with closed pour spout:

(click to enlarge)

Pour Box with open pour spout:

(click to enlarge)

The pattern and instructions for this nifty little pour box can be found here. I printed the pattern out on Crumb Cake cardstock and then cut it out using my totally awesome, all-time favorite, off limits for my husband and boys, Stampin' Up! Craft Scissors (Item #: 108360). Trust me, if I post the item number ... you NEED them!! I added some Gumball Green DSP to each of the panels and used the Pansy Punch to punch the window. I cut a square from a transparency sheet and used Sticky Strip to secure it to the backside of the window. After that, I assembled the box according to the directions and used Sticky Strip to stick each of the sides together. Next, I wrapped a piece of Gumball Green Ribbon around the box and tied a bow at the top. To finish my pour box, I printed the sentiment using my laser printer, cut it into a banner, and attached it under the bow using a glue dot.

Hallie's Helpful Hints:


It is best to fill the pour box BEFORE you seal the top closed, otherwise you will have to insert your candy thru the pour spout.

Sticky Strip is a pressure sensitive tape. This means you need to apply pressure to it, using something like your bone folder, in order to release the red "bologna" tape so that it peels off easily.

Have a blessed Tuesday and I will see you back tomorrow.
~Hallie

Monday, March 10, 2014

7 Days to St. Patrick's Day!!

Howdy Friends!!

Happy Week Before St. Patrick's Day - I hope you are ready for some GREEN!! If you've been watching my Handmade by Hallie Facebook Page you know from the sneak peeks that I've spent the last few days preparing several St. Patty's Day projects. I will reveal one sneak peek each day from now through the 17th so make sure to check back daily.

I am starting off with the most simplistic of the projects I made. If you know me, you know that simple is not my forte; therefore, it is extremely difficult for me to do. Meticulous, methodical, and/or detailed oriented - YES, PLEASE! Simple - NOT.SO.MUCH!! I avoid it like the plague! Seriously, I cringe at the mention of the word and start running for the hills thinking about all of the other things I could possibly do to avoid the "s" word. I would rather organize the letters in alphabet soup alphabetically than have to incorporate simple into anything I create. Now that you clearly understand that I have a serious aversion to the word, I will move on to my SIMPLE project which happens to be a ... bag-a-lope. That's right, an envelope turned into a bag! 

Last week Becky Roberts, Inking Idaho, posted a cute bag-a-lope on her blog and asked if any of us had been stamping long enough to remember when they were the CRAZE. I tucked my head and raised my hand because they were the fad 10 YEARS ago. To make myself feel better let me take a moment to justify explain that I had just started stamping and I remember them because a bag-a-lope was one of the first non-card items that I made. I also remember I was SUPER proud of my accomplishment so I'm sure if I look hard enough I can find it tucked away in a bin in the top of my craft closet. Maybe don't hold your breath one of these days I will try to find it and post it.

After taking that trip down memory lane with Becky, I decided that I wanted to make a bag-a-lope as one of my St. Patty's Day projects. It couldn't be a simple and ordinary bag-a-lope though ... you know, one where I followed the instructions on Becky's blog and finish it in 10 minutes. Oh No - not this girl!!! I decided that making my own *original* bag-a-lope, from scratch, with and invisible seam line on the back, and using some cah-ute Designer Series Paper was the way to go!! 

You see, a "regular" bag-a-lope transforms an envelope into a bag. Becky's bag-a-lope transformed a cute little pre-made flat sack into a bag. Then there was mine ... the one that started out as a flat piece of 12X12 DSP. Yep, I was going to re-invent the wheel bag-a-lope. Five hours and 700 seven mock bag-a-lopes later, I finally had my pattern perfected and was ready to make my final bag-a-lope using some Gumball Green Polka Dot DSP. By the time it was all said and done, and I had succeeded at re-inventing the bag-a-lope, I was too mentally exhausted to do anything else besides *simply* add a button and some Baker's Twine so that's exactly what I did.


(click here to enlarge)

Have a blessed day and I will see you tomorrow!!
 

Stampin' Hugs! 
~Hallie

Sunday, March 9, 2014

Sneak Peek Con't...

Here's another sneak peek for my St. Patty's Seven Day Reveal coming up this week!!  Are You Ready?!?  Get Excited!!

(click to enlarge)

Final Sneak Peek Debut:


See you tomorrow!!!

~Hallie

Saturday, March 8, 2014

Sneak Peek(s) ...

Happy Saturday Everyone!!

It's a cool, overcast, and rainy day for me here in my little niche of the great state of Texas so I am spending the day in my craft room crafting up some CAH-UTE little containers!!! Make sure you check back throughout the day because I will be adding some more sneak peeks!!  What are YOU doing today?!?

Sneak Peek #1:

(click to enlarge)

Sneak Peek #2:

(click to enlarge)

Sneak Peek #3:

(click to enlarge)

Sneak Peek #4:

(click to enlarge)

Any guesses of what kind of containers these might be?!?

Hope you've enjoyed today's sneak peeks. Stay tuned for a St. Patrick's Day WEEK full of surprises!!

~Hallie

Thursday, March 6, 2014

Good Luck!!

Greetings Guys & Gals!!

I'm sure you couldn't help but notice that I changed the look of my blog. Given my love of polka dots, you can imagine how excited I was to find a polka dot blog header that I can change the color of. After debating over all of the pretty colors, I chose green in honor of St. Patrick's Day. Speaking of St. Patty's Day, I have another fun little card for you! It comes filled with lots of Irish luck even though I don't believe in luck ... or coincidences ... or accidents*. It also comes to you from an oldie but goodie stamp set that I had <GASP!> never used; Sweet & Simple Salutations.

(click to enlarge)

Please hang tight while I digress for a moment to say that it is at times like this that I am glad I hang on to my retired stamp sets because Stampin' Up! isn't currently offering any St. Patrick's Day themed sets. I'll go ahead and admit that I've also been known to buy stamp sets that I can see myself using in the future because certain types of images, like the one today, only make rare appearances in the catalog(s). That means I need to buy them while they are available. I prefer to think of this as being prepared instead of hoarding or insanity!!  Don't judge!! A few other oldie but goodies that come to mind are Circus Train, Cowboy Kid, Ladybug Picnic, Monkey Business, Silly Sealife, Sock Monkey, Tractor Time, and Yeehaw. Do you have a/any favorite retired set/sets? What about regrets for not buying a set when it was available?  If so, I'd love for you to leave a comment at the bottom of this post.

Now to pick up where I left off and give you the details of today's card. I started off by stamping the horseshoe image onto a piece of Neenah Classic Crest Solar White cardstock using Memento Tuxedo Black Ink. I colored the image using my Copics alcohol markers (I can't wait for our Stampin' Up! Blendabilities launch) and then cut it out using my circle Nestabilities. I also cut a Basic Black circle (1/2 die size larger), a Gumball Green DSP circle (1/2 die larger), and a Gumball Green circle (1/2 die larger). I paper pierced around the edges of my top (white & DSP) circles using my Paper Piercing Tool and my Stampin' Pierce Mat, attached two Vintage Trinket Brads to the horseshoe, and then layered my circles onto each other using Sticky Strip for the Gumball Green DSP circle and Dimensionals for the white image circle. Once I had assembled my circles, I put a Basic Jewel on each of the four shamrocks. Next, I cut a 11" x 4 1/4" piece of Basic Black cardstock and folded it half to make an a-frame card. Simply put, the front flips up instead of opening towards the left like a typical card. I adhered a piece of polka dot Gumball Green DSP  (3 7/8" x 5 1/8") to a piece of Gumball Green cardstock and used my Perfect Layers tool to create a 1/16" border on all four sides (Gumball Green cardstock measurement is 4" x 5 1/4"). Next, I cut a piece of Basic Black cardstock (1 1/2" x 5 1/8") and ran it through my Big Shot using the Square Lattice Embossing Folder, adhered it to the polka dot DSP using Sticky Strip, and then machine stitched around the edges. I cut a piece of striped Gumball Green DSP (2 1/2" x 4 1/2") and adhered it to a piece of Gumball Green cardstock and used my Perfect Layers tool to cut a 1/16" border on all sides (Gumball Green cardstock measurement is 2 5/8" x 4 5/8") and machine stitched around the edges. I finally assembled my card by adhering the striped rectangle piece onto the Basic Black embossed cardstock using Sticky Strip, attaching the circle with the horseshoe image onto the DSP circle using Stampin' Dimensionals, and then attaching the circles to the striped DSP rectangle with Sticky Strip. To finish off the card, I cut a 4 1/2" piece of Gumball Green ribbon and laid it on the front of the card, wrapped the ends around, and secured them using two small pieces of Sticky Strip followed by Scotch tape. Last, I tied a finger bow and attached it to the Gumball Green ribbon using two Glue Dots.
 
Hallie's Helpful Hints:

Use Sticky Strip to attach dry embossed pieces on your cards. The pieces stick better and don't come off.

When machine stitching around the edges of your cardstock, make sure that the area to be stitched is free from all adhesives. They will gum up your needle -- trust me on this one!


By using the Nestabilities Petite Circles with the Standard Circles, you can increase your dies by 1/2 sizes.

When adhering paper pierced circles, re-pierce each hole so that both layers are pierced, otherwise, the bottom layer has a tendency to close the holes on the top layer.


When adhering ribbon to the backside of a piece of cardstock, adhere it using Sticky Strip and then cover it with Scotch Tape for added reinforcement.

That's plenty, and all for today!!
~Hallie
 
"For I know the plans I have for you, "declares the Lord, “plans to prosper you and not to harm you, plans to give you hope and a future." Jeremiah 29:11 
*I believe/ know that God's plans are intentional and perfect; therefore, there are no such things as luck, accidents, or coincidences.


Wednesday, March 5, 2014

Lucky!

Happy Hump Day Wednesday!

What do a shamrock, the color green, the word "Lucky", and St. Patrick's Day have in common?!? That's right, they are the theme of my card for this week's MOJO Monday Sketch. Julee Tilman designed a dreamy little sketch and I thoroughly enjoyed creating this little work of he{art}.  I started off with a Basic Black card base, adhered some Gumball Green DSP to a piece of Wild Wasabi cardstock and stitched around the edge. What's that?!? I know, I know!! WHO KNEW that Wild Wasabi matched the light green polka dots on the Gumball Green DSP?!?  I sure didn't ... but they do ... and it works for me!!  Next, I embossed a piece of Whisper White cardstock and adhered it to a piece of Basic Black cardstock, cut a mat using my Perfect Layers tool  and stitched around those edges too. Then I used my square Nestabilities to cut a piece of striped Gumball Green DSP. I adhered it to a piece of Wild Wasabi cardstock, used my Perfect Layers tool to make a mat, and then stitched around the edges.  I used a smaller square die to cut out the center window and then used my Postage Stamp punch to punch a piece of Basic Black cardstock that I embossed using my Square Lattice embossing folder.  I stamped the shamrock from the Lucky Day stamp set in Wild Wasabi Classic ink and attached a Basic Jewel in the center.  I made my banner using Whisper White cardstock and used my Stamp-A-Ma-Jig to position the word "Lucky!". I used a ton of Dimensionals to attach each of the layers which gave my card lots of ... wait for it ... DIMENSION!!
One trick that I stole learned from, a fellow Stampin' Up! demonstrator, was to die cut the back side of my cardstock to prevent the embossed lines from the die from showing on the front of my cardstock. Genius, if I do say so myself!!


Did you notice that I added a "Shop With Me" button on the right side of my blog as well as the Pinterest pinning buttons on my images?!? I added them at the request of one of my dear readers because I'm nice like that I aim to please. I'd love to read your feedback about them, as well as anything else that you would like to see on my blog. Please leave me a comment at the bottom of this post and stay tuned for a couple more additions that will make your social media sharing experience even easier.

 
(click to enlarge)

I'm off to see what kind of crafty trouble I can get into goodness I can come up with to blog about next.
Stampin' Hugs & Blessings!
~Hallie
"Whatever you do, work heartily, as for the Lord and not for men, knowing that from the Lord you will receive the inheritance as your reward. You are serving the Lord Christ." Colossians 3:23-25

All supplies Stampin' Up! (you can order HERE) unless otherwise noted.
Stamp Set:  Lucky Day  (retired)

Ink: Memento Tuxedo Black; Wild Wasabi Classic Ink
Cardstock:  Basic Black; Whisper White; Wild Wasabi; Gumball Green DSP

Accessories: Nestabilities (squares); Punch (postage stamp); Basic Jewel; Dimensionals; Machine Stitching

Tuesday, March 4, 2014

Thanks From the Bottom of My ...

Happy Tuesday Everybody!

Little did I know, when I made reference to my backside being bigger than my heart in yesterday's post, that I had a stamp set with those words. Oh.My.Gosh!! I literally busted out laughing when I came across this image and sentiment in the Not So Seriously stamp set. The image cracks me up and the sentiment is perfect!! It was then that I knew I had to make a Thank You card for y'all (that is Texas for you all), my dear readers, in appreciation for you following along on my blogging journey. So without further delay ... THANK YOU for being a part of my journey and I hope you find as much humor in this cute card as I do!!

 
(click to enlarge)

That's all for today. I will be back tomorrow with some St. Patty's Day goodness!!

Have a blessed day ... and don't forget to GO VOTE!!
~Hallie
"For you formed my inward parts; you knitted me together in my mother's womb. I praise you, for I am fearfully and wonderfully made. Wonderful are your works; my soul knows it very well. My frame was not hidden from you, when I was being made in secret, intricately woven in the depths of the earth. Your eyes saw my unformed substance; in your book were written, every one of them, the days that were formed for me, when as yet there was none of them." Psalm 139:13-16

All supplies Stampin' Up! (you can order HERE) unless otherwise noted.
Stamp Set:  Not So Seriously (retired)

Ink: Memento Tuxedo Black
Cardstock:  Basic Black; Whisper White; Real Red; Fresh Prints DSP

Accessories: Nestabilities (circle & scallop circle); Corner Rounding Punch; Paper Piercing Tool; Brights Button; White Baker's Twine; Basic Jewels; Dimensionals; Googlie Eyes; Machine Stitching
Techniques:  Paper Piercing; Paper Piecing

Monday, March 3, 2014

Go Green!!!

Howdy Y'all and Happy Monday!!! I am so excited to see that after two short weeks of entering the blogosphere, my viewer audience has gone beyond the United States and reached Australia, Canada, Germany, Poland, and the UK. That's pretty amazing, and not too shabby, for a homegrown Texas girl. So ... here's a warm Texas *WELCOME*, and a Texas size *THANK YOU* to each of you from the bottom of my butt because it's bigger than my heart. You are the reason I'm taking this little blogging journey; I'm not going to mention the not so gentle shove nudge from my very supportive hubby.

Now, I'm normally not one to celebrate St. Patrick's Day because I'm German (Guten Tag meine lieben deutschen Leser), not Irish, but this year has been a little different. For some reason I have been attracted to clover, shamrocks, and the color green. Could it be because I have several a couple of St. Patty's Day stamps that have been neglected and never used? Well, since my hubby reads my blog, far be it from me to confess that as the TRUTH behind my attraction. *wink*

Today I am sharing a sneak peek that I showed on my Facebook page a couple of weeks ago.  You can view my Handmade by Hallie Facebook Page HERE, and I'd appreciate a *LIKE* and a *SHARE* while you are there.

I created this little gem by following the sketch from MOJO Monday #306 and the colors (Pumpkin Pie, Gumball Green, Whisper White) from the Pals Paper Arts Challenge #191. Other than the shamrock, my card is pretty self explanatory; lots of layers, embossing, paper piercing, and machine stitching. I created the shamrock by punching out six pansies using the Pansy Punch and running them through my Big Shot using the Square Lattice Embossing Folder. Next, I cut half of one petal off to make it shorter and give the appearance of a stem. I folded each pansy in half and used Glue Dots to connect them together. Finally, I used Dimensionals to attach my newly created shamrock accent to my card.

 
(click to enlarge)

That's all for today. I'm off to create using today's sketch: MOJO335. Will you play along?!? If so, please leave a link to your card in my comments section.

Have a blessed Monday!!
~Hallie
"This is the day that the Lord has made; let us rejoice and be glad in it." Psalm 118:24

All supplies Stampin' Up! (you can order HERE) unless otherwise noted.
Stamp Set:  Go Green (retired)

Ink: Memento Tuxedo Black
Cardstock:  Pumpkin Pie; Gumball Green; Whisper White; 2012-2014 In Color DSP - Gumball Green

Accessories: Nestabilities (circle & scallop circle); Embossing Folders (Chevron, Perfect Polka Dots, Square Lattice); Pansy Punch; Paper Piercing Tool; Basic Jewels; Dimensionals; Machine Stitching

Saturday, March 1, 2014

S {ick} ?

My goal is to keep this post short, sweet, and to the point so your bleeding eyeballs can continue to recover from my last post.

I have a dear friend who was sick ... I made her a card with a matching envelope ... here it is ...

(click to enlarge)

Mission Accomplished!!
Have a great day!
~Hallie

All supplies Stampin' Up! (you can order HERE) unless otherwise noted.
Stamp Set:  Word Play (retired)

Ink: Real Red; Summer Sun; Old Olive; Brocade Blue Markers
Cardstock:  Basic Black; Whisper White; Polka Dot Parade DSP

Accessories: Nestabilities (circle & scallop circle); Paper Piercing Tool; Mini Library Clip; Dimensionals; Machine Stitching