Wednesday, May 21, 2014

Family Reunion Invitations

Hello?!?  Anybody?!? Do I even have any readers left?!?  Has everyone given up on me?!?

Has it REALLY been 2.5 weeks since I've posted?!? Why yes, yes it has ... unfortunately!!! Life has been absotively postilutely (you know, absolutely positively) insane!!  During all of  the mayhem; however, I  managed to barely make and mail our family reunion invites out on time ... if you call finishing and mailing them out exactly one month prior to the reunion "on time". I even took pictures for a tutorial that I *hope* to share with you sometime before I die soon ... but don't hold your breath because you might die. So without further jibber jabber from me, our 2014 Family Reunion invitations, complete with a resort information card and an RSVP card that will be sent back to me.

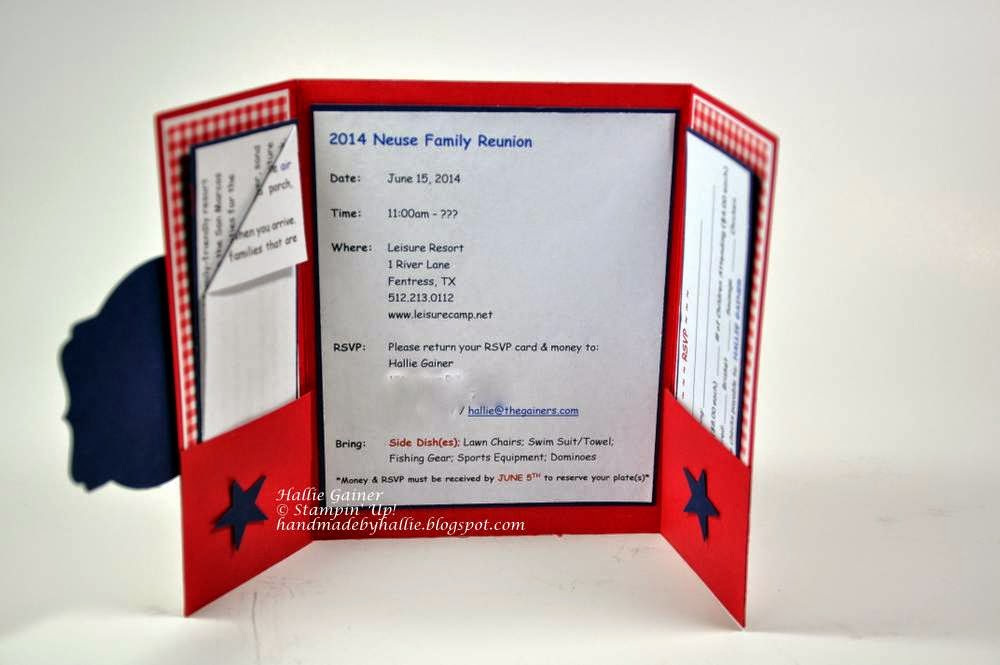
The invitation is a standard gatefold card that I added extra length to so that I could make folding flaps to hold the inside contents. Since the event is a family reunion in June I chose to go with the patriotic/picnic color scheme of Real Red, Whisper White, and Night of Navy. The fabulous DSP (actually it's a hamburger/hot dog wrapper) is from the Country Living kit promotion that Stampin' Up! had a llloooooonnnnnggggg time ago.  I bought two kits knowing that I'd eventually have the perfect occasion to use them for. I do this A LOT with stamp sets too ... but I digress!!!

(click photo to enlarge)

Aside from the flaps that hold the contents, the inside of the invitation is fairly straight forward. I dressed up the outside folding flaps using my Square Lattice Embossing Folder so that when the inserts were removed the flaps wouldn't be naked bare. I color coordinated the inserts and used my color laser printer to match the typing as well because I'm OCD like that.

(click photo to enlarge)

The last two photos are the same invitation but with Real Red as the cardstock base color instead of Night of Navy.

(click photo to enlarge)

(click photo to enlarge)


That's all for me today. I have to get busy working on my June Creative Crew Design Team projects that are due in 7 short days! YIKES!!!

Hugs, Smiles, Blessings, and Happy Stamping!!

~Hallie


Sunday, May 4, 2014

May Design Team Work - Project #4

Happy Sunday, Y'all!!

I'm so excited that I get to share my FAVORITE project from the May challenges with you today.

Theme: Your theme this month is to be “Anything But Average” take inspiration from the past and show us something new! 

Scrapbook & More Focus:  Back in 2009 we CASEd Julie Griffith's idea of a toilet tissue tube book. Try your hand at this project and enjoy the process.

I was thrilled when I read this challenge because I hoard, collect, save toilet tissue tubes just in case I need them for a project such as this. So after gathering up my four toilet tissue tubes I sat down at my desk and decided NOT to use them. <GASP!> That's right, I measured the tubes and quickly figured out that I could create my own tubes using DSP and then keep the actual tubes in case I would need them for a future project. Don't judge!! 

To create my cah-ute DSP tubes, I simply measured the toilet tissue tube and then cut my DSP to those dimensions. I placed a piece of Sticky Strip on the short edge, rolled my DSP into a tube, and then stuck the opposite short edge to the sticky strip. Next, I flattened my DSP tube, making sure that the seam was centered on the back side. Now it was time for me to reach for my handy dandy Bind-It-All and bind my four DSP tubes together.  To create my inserts, I cut Very Vanilla cardstock 1/4" shorter than both the length and width of my tube. I punched out four tabs (tangerine tango, daffodil delight, pool party, and baked brown sugar) using my Ticket Punch, embossed them with my Square Lattice Embossing Folder and then adhered them to the edge of the tube inserts using Sticky Strip. Lastly, I decorated the front of my toilet tissue tube mini-book by adding a piece of burlap ribbon, the starburst saying, a Brights Button, and a piece of Linen Thread that I tied into a bow behind the button.


(click to enlarge)

That's all for me today. I hope each of you has a blessed Sunday!!
Hugs, Smiles, Blessings, and Happy Stamping!
~Hallie

All supplies Stampin' Up! (you can order HERE) unless otherwise noted.* 
Stamp Set:  Starburst Sayings
Ink: Tangerine Tango
Cardstock:  Tangerine Tango, Daffodil Delight, Pool Party, Baked Brown Sugar, Very Vanilla, Retro Fresh DSP

Accessories: Framelits (Starburst), Embossing Folder (Square Lattice), Ribbon (Burlap), Button (Brights), Linen Thread, Sticky Strip, Dimensionals, Bind-It-All*

Saturday, May 3, 2014

May Design Team Work - Project #3

Happy Saturday, Everyone!!

Thanks for taking a few minutes out of your weekend to stop by my little piece of the blogosphere. Since I'd much rather you spend your day creating, instead of being stuck here reading about my creations, I will keep this post short and sweet.

Theme:  
“Anything But Average” take inspiration from the past and show us something new! 

Holiday Focus: National Photography Month

Create a card that looks like a photograph by putting a border around your image and making the image glossy. You may use On Film Framelits or make your own, you may use window sheets for glossiness or crystal effects.

For this challenge, I decided to make an atypical card size so I chose a square card base of 5 1/2" X 5 1/2". I used the Lovely As a Tree stamp set because creating a wooden frame using the Hardwood stamp set came to mind when I read the instructions. After I finished coloring my tree scene, I adhered a piece of transparency film over the top using a tiny bit of 2-Way Glue around the edges of the cardstock. When it came time to assemble the card, I remembered I had the the Woodgrain embossing folder so I used that to add texture to the banner.The awesome layout is from the PPA Sketch Challenge on February 20, 2014 and the button embellishment is simply a Brushed Bronze Designer Button that I tied a piece of Linen Thread to and made two bows with.

Sidenote: Did you know that the Lovely As a Tree stamp set is the OLDEST set in the Stampin' Up! catalog? If I'm not mistaken, it was released in 2001 and has survived every annual retirement since!! DEFINITELY an oldie but goodie!

 (click photo to enlarge)

That's all for today. I hope to see you again tomorrow ... I will be showing my favorite project from this month's challenges!!

(click photo to enlarge)

Hugs, Smiles, Blessings, and Happy Weekend Crafting!!
~Hallie

All supplies Stampin' Up! (you can order HERE) unless otherwise noted.* 
Stamp Set:  Lovely As a Tree, Hardwood
Ink: Memento Tuxedo Black, Early Espresso
Cardstock:  Early Espresso, Gumball Green, Whisper White, Neutrals DSP, Print Poetry Paper Stack

Accessories: Framelits (Banners), Embossing Folder (Woodgrain), Designer Button (Brushed Bronze), Linen Thread, Dimensionals, Alcohol Markers*


Friday, May 2, 2014

May Design Team Work - Project #2

So what happens when you start blogging and then lay down for a SHORT nap and your hubby doesn't wake you up?!?  That's right, you have to finish your blog post in the morning!! Oops!

Anyhow, I'm so glad you decided to stop by today because I am sharing my 2nd project for this month's CCREW Design Team. Since I've already made you wait until this morning for my post, I will jump right in to my project and not make you wait any longer.

Theme:  
“Anything But Average” take inspiration from the past and show us something new! 

Catalog Focus: Scoring Tools

Use any or all of the scoring tools - Simply Scored Tool, Simply Scored Borders Plate, and/or Simply Scored Diagonal Plate to add interest to a gatefold card.

(click to enlarge)

This card was actually REALLY simple to make and I love the fact that it isn't your typical card. So instead of me rambling on about MY card ... how about YOU make your own with these easy peasy instructions?!?

1.) Cut a piece of cardstock 4 1/4" X 8 1/2".
2.) Score 2 1/8" from each end.
3.) Fold along score lines and decorate as desired.
4.) Adhere the left half of your center image (my coffee cup) 
     to the left panel of your card front.
5.) Cut a 3/4" slit in the score line on the left half of your card 
     to run the ribbon through.

That's all for today ... see you tomorrow!!


Hugs, Smiles, Blessings, and Happy Gatefold Card Making!
~Hallie

All supplies Stampin' Up! (you can order HERE) unless otherwise noted.* 
Stamp Set:  Perfect Blend
Ink: Memento Tuxedo Black
Cardstock:  Basic Black, Strawberry Slush, Whisper White, Kaleidoscope DSP

Accessories: Paper Crimper, Ribbon (3/4" black chevron), Dimensionals, Paper Snips

Technique: Paper Piecing (coffee cup), Paper Piercing (inside center panel)

Thursday, May 1, 2014

May Design Team Work - Project #1

Hi Guys & Gals!!  I am so glad that you have stopped by today because you are in for a treat the next four days. Since it's the first day of the month, I can begin showing you my projects for the May CreativeCrew Design Team challenges.  Let's get started.

Theme:  
“Anything But Average” take inspiration from the past and show us something new! 

Catalog Focus: Daffodil Delight, Island Indigo, Gumball Green, Smoky Slate

Use a technique of your choosing that imitates our Watercolor Wonder Designer Series Paper.

Okay!!! Easy Peasy ~ I got this!! Well, wait a minute, maybe not!!! This just might  be a little more difficult than I expected, you know, like a challenge!!! Yep ... it definitely was a CHALLENGE and let me tell you why.  First, if you recall, the design team members have worked with the Watercolor Wonder DSP in two of our prior month's challenges (February & April) so this would be the THIRD time to create with it and we couldn't use either of our prior month's ideas or techniques <insert some panic, confusion, and defeat as I am at a complete loss flipping through the pages of the Watercolor Wonder DSP pack>.

Next comes the point when I have to admit that I am N-O-T a fan of the paper with all of the random watercolor circles on it but it appears that it is the only piece of paper that I am going to be able to remotely mimic even though I haven't a clue how to do it!! So as I sat blankly staring at the paper the wheels started to turn and smoke poured out of my ears I began to think of the various ways that I could possibly recreate the circles. A few minutes, and a short drive, later I found myself in the toy aisle at our local Dollar General Store searching for what would hopefully be my saving grace ... BUBBLES!!  

Now fast forward to me successfully finding and buying bubbles, returning home, gathering up my supplies (watercolor paper and reinkers), and heading to the kitchen where I mixed my magic potion bubble solution with reinkers and began blowing bubbles. It took a little practice to figure out how to make the circles, but it eventually worked like a charm and VIOLA! I had successfully created a very close replica of the Watercolor Wonder DSP!!

I quickly learned that if I would blow the bubbles and gently catch them on the watercolor paper and let them sit before popping, they created a nice circle; on the other hand, if they popped immediately when they contacted the watercolor paper, they created a splatter.  Either way, they both worked to successfully mimic the Watercolor Wonder DSP which meant SUCCESS for me!! Hallelujah!

When I finally had my piece of watercolor paper, complete with circular popped bubbles, it was time for me to assemble my card.  I knew that I wanted to have some of the original Watercolor Wonder DSP on my card as a point of comparison for my created DSP so I decided to use a small original swatch as my main focal point.  After that decision was made the rest of my card came together fairly easily and I am extremely pleased with the outcome.

(click photo to enlarge)

That wraps up today's card. Make sure and check back tomorrow to see my next project ... a gatefold card with a coffee cup.

Hugs, Smiles, Blessings, & Happy Stamping!!
~Hallie 

All supplies Stampin' Up! (you can order HERE) unless otherwise noted.
Stamp Set:  Four You

Ink: Tangerine Tango
Cardstock:  Island Indigo; Tangerine Tango; Gumball Green; Daffodil Delight; Smoky Slate; Watercolor Paper; Watercolor Wonder DSP

Accessories: Reinkers (Tangerine Tango, Daffodil Delight, Gumball Green, Island Indigo); Embossing Folders (chevron, square lattice, decorative dots); Punch (scallop border); Paper Piercing Tool
Non-SU!:  Nestabilities (circles); Machine Stitching